Last Topic "Synchronizing Time"
Misc Hardware Installation
The following sections outline the basic steps to install the most common hardware attached a POS Station: Customer Display and Cash Drawers. Visit the Restaurant Manager User Guide (Configuring Peripherals) for setup instructions for additional hardware options.
INSTALLING CUSTOMER DISPLAYS
External Customer Displays that attach to a serial port (COM1-8), are driven directly by RESTAURANT MANAGER. Simply enter the port name under Station Configuration, and configure the port as described above for local printers.
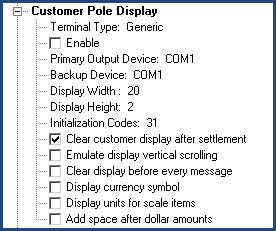
The RM BackOffice Module Station Configuration Setup Form includes options for interfacing your Restaurant Manager POS System to different models of customer pole displays.
Use the [Search] button on the Station Configuration Setup Form to locate and configure the following “Customer Pole Display” settings for the station highlighted on the Stations List:
Terminal Type- Use these setting to indicate the customer display model. Restaurant Manager is approved for use with the following models:
- Panasonic
- IBM 4695
- Javelin
- IBM Sure POS 500
- Partner Tech CD7220 (Use generic setting)
- Posiflex TP-3000 (Use generic setting)
- Posiflex PD 2500 (Use generic setting)
- Posiflex PD302 (Use generic setting)
If you are configuring the system to work with a model not listed above you must set the Terminal Type to “Generic”.
ASI constantly tests new hardware and the most up to date certified hardware list can be found on the Dealer page of the ASI website.
Enable- Check this box to enable the customer display interface according to the settings defined in the other fields under the “Customer Display” heading.
Primary Output Device- Click on the down arrow beside this field and select the port to which the display is attached.
Backup Device- Backup pole displays are not support. Leave this filed blank.
Display Width- Type in the number of characters that fit across the display, as detailed in the user’s manual for the particular device you are using.
Display Height- Type in the number of rows that fit on the display, as detailed in the user’s manual for the particular device you are using.
Initialization Codes- Click on the ellipsis button to call up fields for entering the initialization codes as presented in the user’s manual for the particular device you are using.
Clear Customer Display after Settlement- Uncheck this box if you wish the transaction amount to remain on the display after the settlement is finalized.

It is suggested that you leave the Primary Output Device blank (remove com 1 setting) if you are not using a customer pole display. Changing the “output” setting will insure against device conflicts
INSTALLING CASH DRAWERS
For cash drawers that attach directly to a serial port (COM1-8), follow the same procedures as described under Installing Local Check/Receipt printers. Then insert the trigger codes for the cash drawer under Printer Codes, in Station Configuration.
The following document will explain Installing Compulsory Cash Drawers
http://www.actionsystems.com/TechSupport/Compulsory%20Cash%20Drawer.htm
Setup Dual Cash Drawers:
Use the following the steps to setup Dual Cash Drawers under RM:
-
Create a printer type called Cash Drawer B in PRTCODES.DBF database. You can open this file by going in to DOS, c:\rmwin and typing dbu prtcodes.dbf. Alternatively, you can open a dbf file using DBF Navigator or similar.
-
In the RM BackOffice Module, go to Setup > Station Configuration > Devices > Printer Codes and select the new printer type and enter the Cash Drawer B codes into "Open Cash Drawer" field. For example, for Epson TMT88 it would be 27 112 1 50 200
-
Then again under Devices > POS Cash Drawers > Generic Cash Drawer Setup, for Cash Drawer B, enter the printer name (same as Cash Drawers A) for Primary Device. Then for Printer Type enter the new printer type you created in prtcodes.dbf: Cash Drawer B
